 When I opened The Digital Darkroom in 2002 my intention was to provide scanning, editing, printing and other services for pro photographers, many of whom I knew from my work in the pro photolab business. But because so many pros were making the transition from film to digital it soon became apparent that I could serve them best by teaching what I had learned from my own film-to-digital shift rather than simply providing services. (Much like the “teach a man to fish” quote by Lao Tzu.) As digital photography blossomed in the early 2000’s my clientele quickly expanded to all sorts of photographers, pro and hobbyist. In the years since 2002 I have met so many interesting and creative people who inspire me on a daily basis with the work they create and the paths they are on.
Shooting Black & White Just Got Different With LR Classic 9.2
If you like shooting in black & white, you’ll love this new addition to Lightroom Classic
Many photographers who work in black & white prefer to setup their cameras with a monotone profile so that live-view and reviews on the camera back are in black and white. This helps them see the scene in black and white while shooting. Camera manufacturers use various terms for profiles, such as Picture Mode or Picture Style, as shown in the Canon EOS R menu in Figure 1.
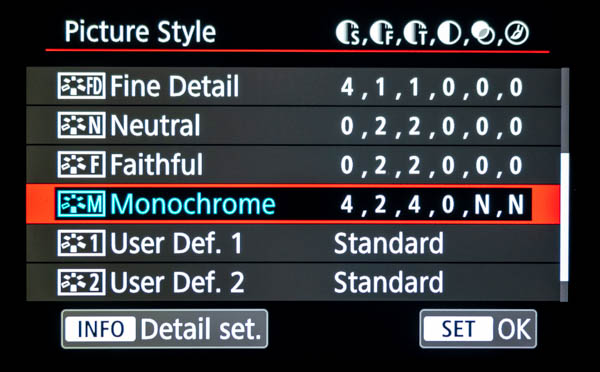
Figure 1
But when the raw files are imported into Lightroom they come in as color. This is because Lightroom replaces the in-camera profile no matter if it’s Landscape, Portrait, Monotone or whatever with a standard profile named Adobe Color. Now in the latest release of Lightroom Classic (9.2) an addition to the Presets preferences gives us the ability to import raw photos with the in-camera profiles that were used during capture.
To set this up go to Lightroom > Preferences (Mac), Edit > Preferences (Win) and choose the Presets tab. Then all you need to do is change the Master menu to Camera Settings instead of Adobe Default, as shown in Figure 2 below. Now when you import raw files from any of your cameras, the camera profile used in-camera is used in Lightroom automatically.
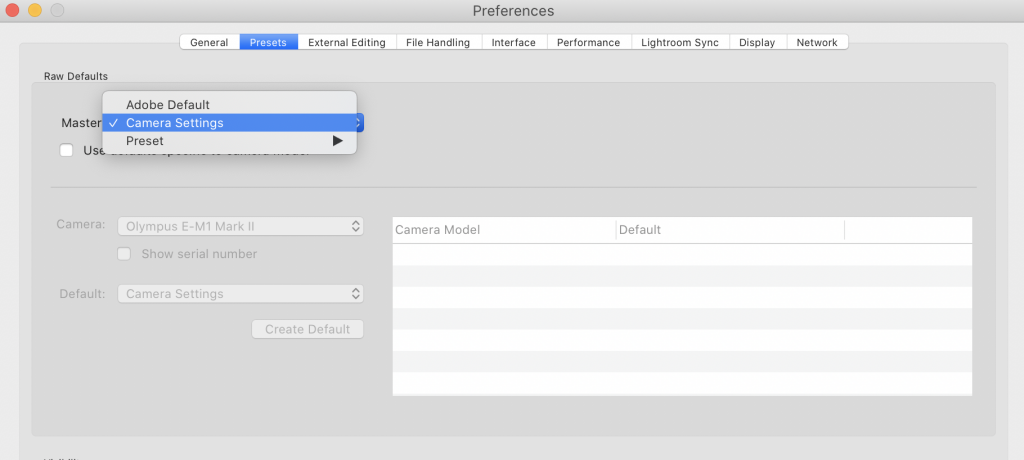
Figure 2
To see which profile Lightroom Classic is using, go to the Profile section at the top of the Basic panel in the Develop module. If your camera was setup for monotone, you’ll see the profile listed as shown in Figure 3 below. The best part is that you can change the raw file back to color by choosing Color in the Treatment section at the top of the Basic panel.
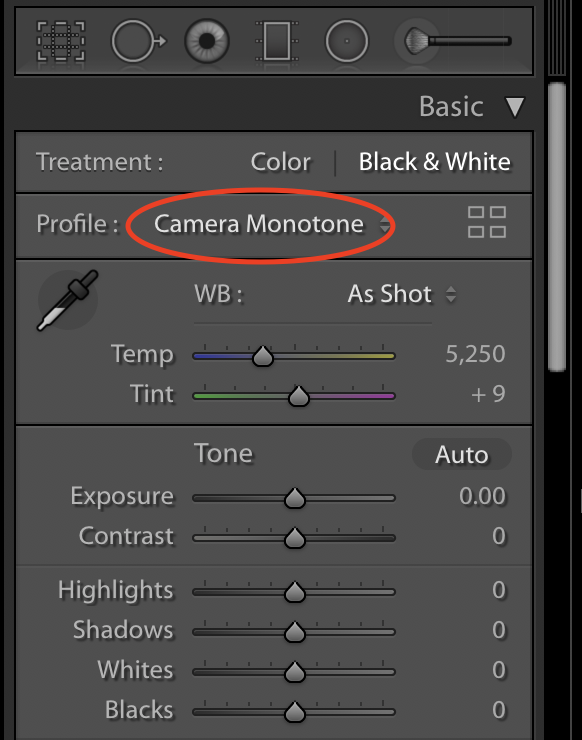
Figure 3
One thing I want to caution you about. If you have previously created import defaults for your cameras using the old method (Develop > Set Camera Defaults) to add settings like chromatic aberration correction during import, those settings will no longer be applied. The easiest way to solve this problem is to create a custom develop preset with the settings you want. Then you can choose this preset during the import process to add those settings to your raw files as they import. Figure 4 shows where I have selected an import preset that applies lens corrections and chromatic aberration removal. This is actually simpler than the old way of saving camera defaults because you only need to create one develop preset for all cameras instead of saving defaults for each camera.
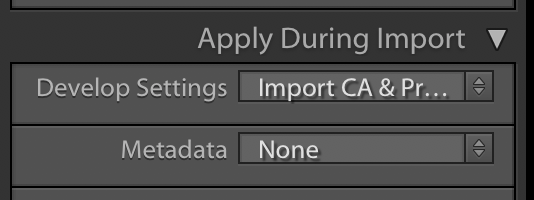
Figure 4
Naturally this isn’t just limited to monotone profiles/styles. It works for any profile you want to use in-camera when shooting raw. And the best thing is you can always revert back to the Adobe Standard profile, or any other profile you want, by changing the profile in Lightroom’s Develop module.
Which Version of Lightroom?
Which Version of Lightroom Are You Using?
In recent years Adobe has done a really good job of confusing everyone about its versions of Lightroom. Back in the old days we only had one current version at a time and they were named Lightroom 1, Lightroom 2, etc. This numbering strategy changed when Adobe moved most products to its subscription model, named Adobe Creative Cloud.
At the start of the Creative Cloud Lightroom was called Lightroom CC. Initially this change caused a bit of confusion over the final standalone version, Lightroom 6, and the subscription version. Even though the subscription version is a Creative Cloud product, the software installs on your desktop and all of your files stay there too. So it wasn’t a true cloud computing solution like QuickBooks Online, for example where the software is stored in the cloud and you can also store your data there too.
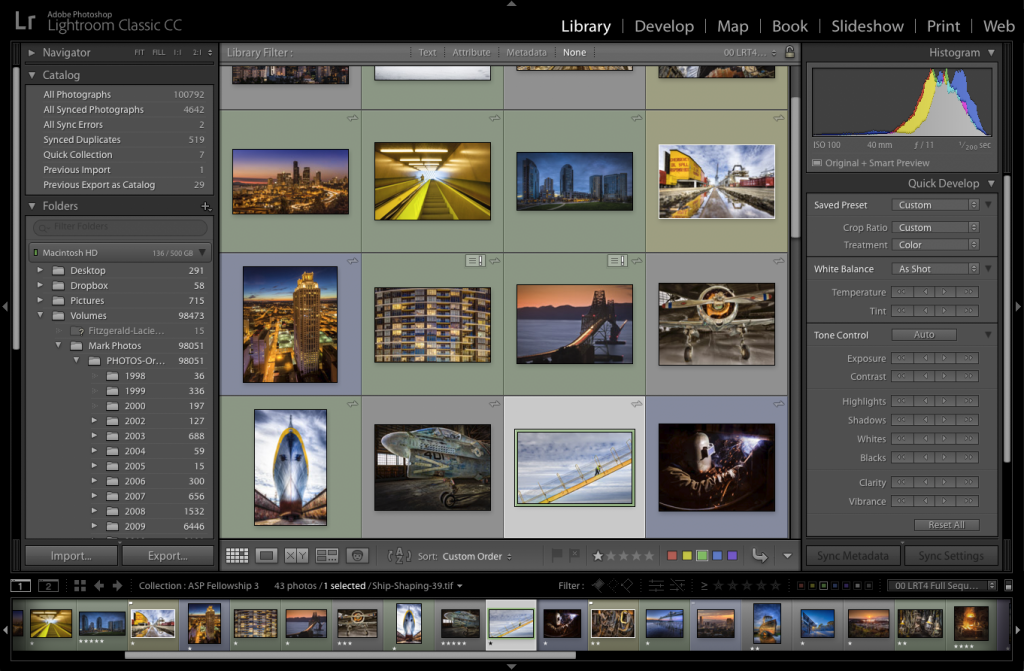
The desktop version, Adobe Lightroom Classic CC. Notice that it has an Identity Plate at the top-left and a Module Picker at the top-right (Library, Develop, etc.) just like previous desktop versions (i.e. Lightroom 6).
But the confusion intensified when Adobe introduced a second version of desktop Lightroom that is intended as more of true cloud solution. The software still installs on your desktop but the photos can be stored in the cloud. (This version is very similar to the version of LR that’s used on mobile devices. That version was previously named Lightroom Mobile. Now it’s simply named Lightroom for iOS and Android devices.)
Adobe rebranded the previous Lightroom CC as Lightroom Classic and named the new cloud-based version Lightroom. I can’t tell you how many people I’ve met who are confused by this. And it’s no wonder.
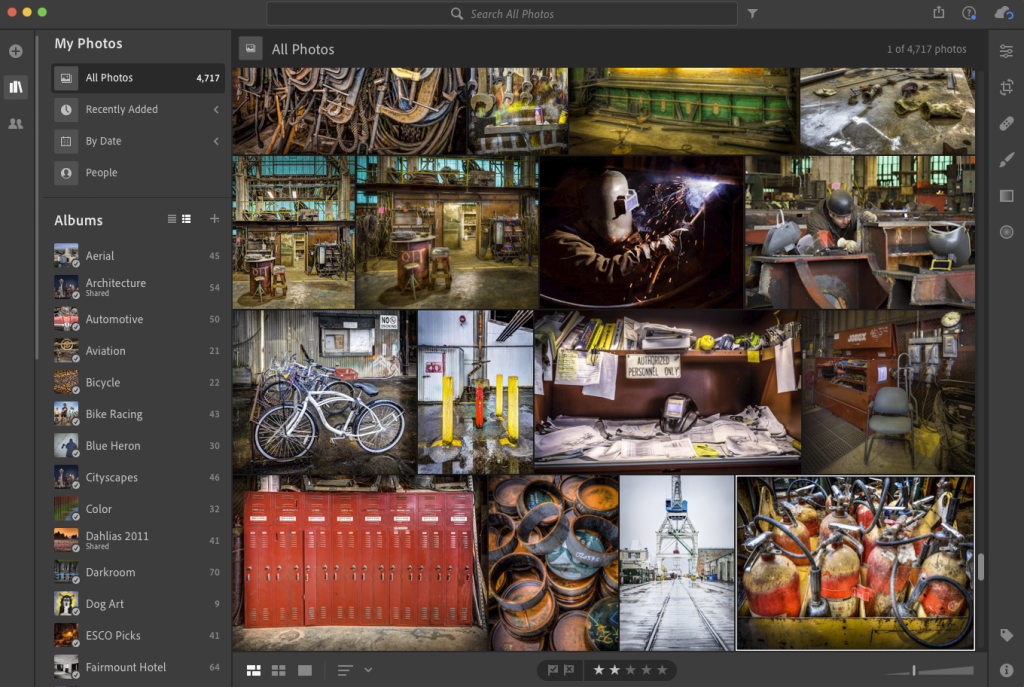
The cloud-based version, Lightroom CC. Notice it doesn’t have an Identity Plate or a Module Picker. It also has Albums on the left instead of Folders.
This cloud-based version of Lightroom CC has its uses, but it isn’t as fully featured as the desktop Lightroom Classic CC (at least not yet). Lightroom CC can be a great adjunct to the desktop version when you’re on the go, but most serious photographers focus their workflows on Lightroom Classic CC.
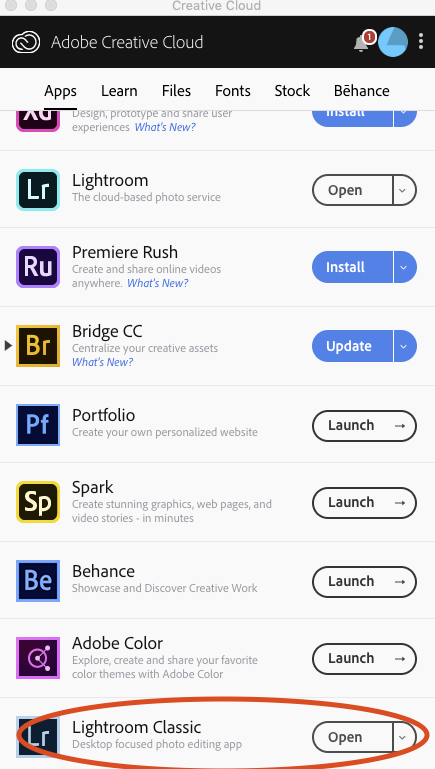
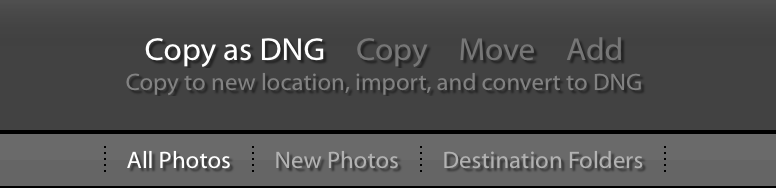
If you subscribe to the Adobe Creative Cloud Photography plan, you are entitled to both versions of Lightroom in addition to Photoshop CC. When you download or update your desktop version of Lightroom Classic, be sure to select the version circled at the bottom of the image below.
Adding Watermarks In Lightroom On Your Mobile Device
One of the cool things about having Lightroom CC on your mobile device is the ability to email and post to social media directly from your device. If you are going to use this handy feature, it’s good to know how to watermark your photos before posting them. I am often surprised by how many Lightroom CC mobile users don’t realize how easy it is to apply a watermark.
People have mixed feelings about watermarks. While some find them distracting, most professionals use watermarks to identify them as the maker of the image. When it comes to watermarking for me, it really depends on the type of image I’m sharing. If it’s a cute photo of our dogs doing something silly, I won’t use a watermark. When it’s one of my professional images, I always apply a watermark. The steps below detail how easy it is to turn on watermarking in Lightroom CC on you mobile device.
1) Open Lightroom CC on your mobile device and go to the main screen that shows your albums. Tap on the Lr icon at the top above where it says “All Photos” (circled in Figure 1) to open the Settings menu shown in Figure 1.
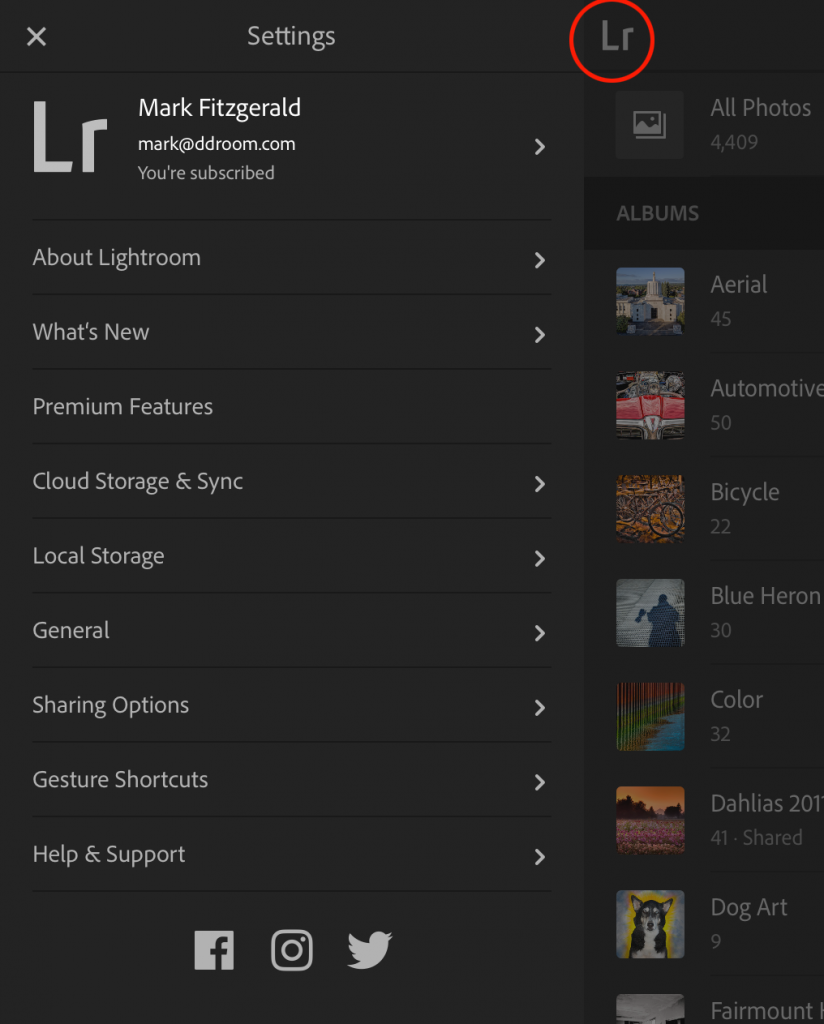
Figure 1
2) Tap Sharing Options to open the dialog shown in Figure 2. Tap the button to the right of “Include” so that it moves to the On position. This turns on the watermarking feature for all of your sharing. Type the watermark information you want to display on your photos in the text box.

Figure 2
3) Tap Customize to open the dialog shown in Figure 3. (A sample image is displayed to help you visualize what your watermark will look like.) This dialog enables you to customize the look of your watermark. Use the first row of options to make the text bold and/or italic. And you can rotate it to run down the side of the image instead of across the bottom. And you can use the color swatches to make the watermark text white or black.
Then use the Size, Opacity, and Offset sliders to further customize the look of the watermark. Increasing the value of the Offset slider moves the watermark away from the edge of the image and toward the center. I prefer to give my watermark a bit of offset because I don’t like it too close to the edge.
The circles around the outside and in the center of the sample image represent anchor points. These are used to anchor the watermark to a particular area of the image. In Figure 3 you can see that I have it anchored at the bottom-left. I recommend experimenting with the Customize options until you find the right combination for the watermark look and feel that works for you.
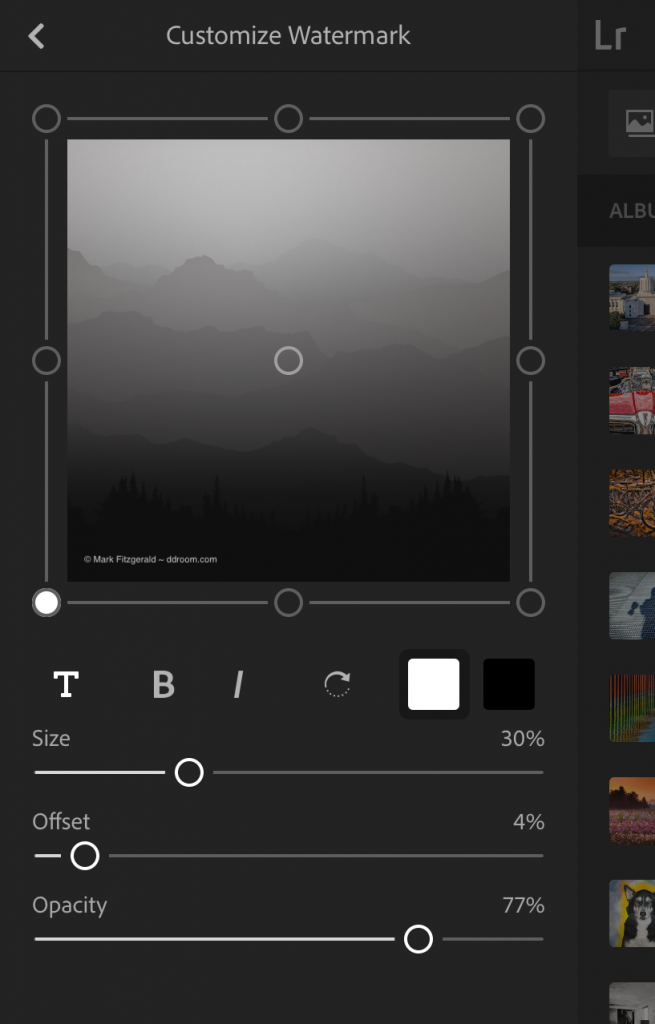
Figure 3
4) After you have the watermark looking the way you like it, use the back arrow at the top to back out of the dialogs until you’re back to the main Settings dialog (Figure 1). Then tap the “X” to close that dialog.
That all there is to it. Now your watermark is ready to go and will be on the images you share via email and social media. If you want to see how to use Lightroom CC on your mobile device to easily share photos to Instagram, check out this blog: Using Lightroom CC To Simplify Your Instagram Workflow.
Using Lightroom Classic to Simplify Your Instagram Workflow

Posting photos to Instagram from your computer can be a pain in the you-know-what. That’s because Instagram is intended as a mobile platform so posting from a computer requires a special app or a workaround. Most of the workarounds I’ve seen have the user exporting a photo from Lightroom and emailing it to themselves. Then they have to save their email attachment to their photos on the mobile device before they can post. That’s not too difficult, but it isn’t very elegant. If you’re a Lightroom Classic CC user, you can create a simpler and more powerful workflow to quickly upload photos to Instagram with a few clicks.
The bird’s-eye view of the process looks like this:
- Setup mobile syncing in Lightroom Classic CC on your computer.
- Create an Instagram collection on your computer that you will use for all of your potential Instagram photos. (The only way to synchronize photos from the computer version of Lightroom Classic CC to your mobile Lightroom CC is through collections.)
- Install the Lightroom CC app on your mobile device(s).
- Upload photos on your computer to Instagram from your mobile device.
Here’s how it works:
1) Open Lightroom on your computer and click the Identity Plate at the top-left. When the dialog opens (shown in Figure 1) choose Start (to the right of Sync with Lightroom CC). Then follow the instructions to login. If you already have Sync selected, make sure it isn’t paused.
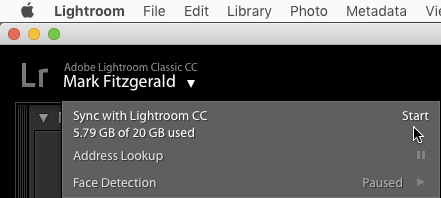
Figure 1
2) Create a new collection (Library > New Collection) and name it Instagram (shown in Figure 2). Though it isn’t necessary, I suggest making this collection the target collection to make it super simple to add photos to it by selecting them and pressing the “B” key on your keyboard.
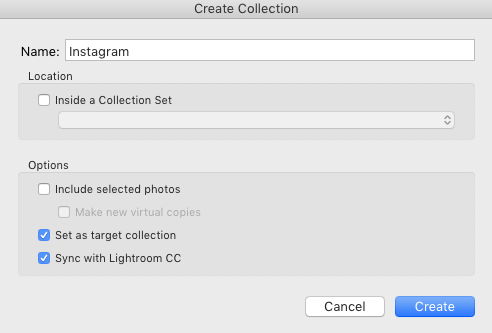
Figure 2
3) Choose some photos you want to post to Instagram and add them to the collection. I do this whenever I have a potential Instagram photo. Once they are in the collection I can post them whenever I want.
4) Install the Lightroom CC app on your mobile device and follow the instructions to login and activate it.
5) Go to your Lightroom CC Instagram collection on your mobile device and select a photo you want to upload to Instagram. Tap the Share button at the top-right (circled in Figure 3).
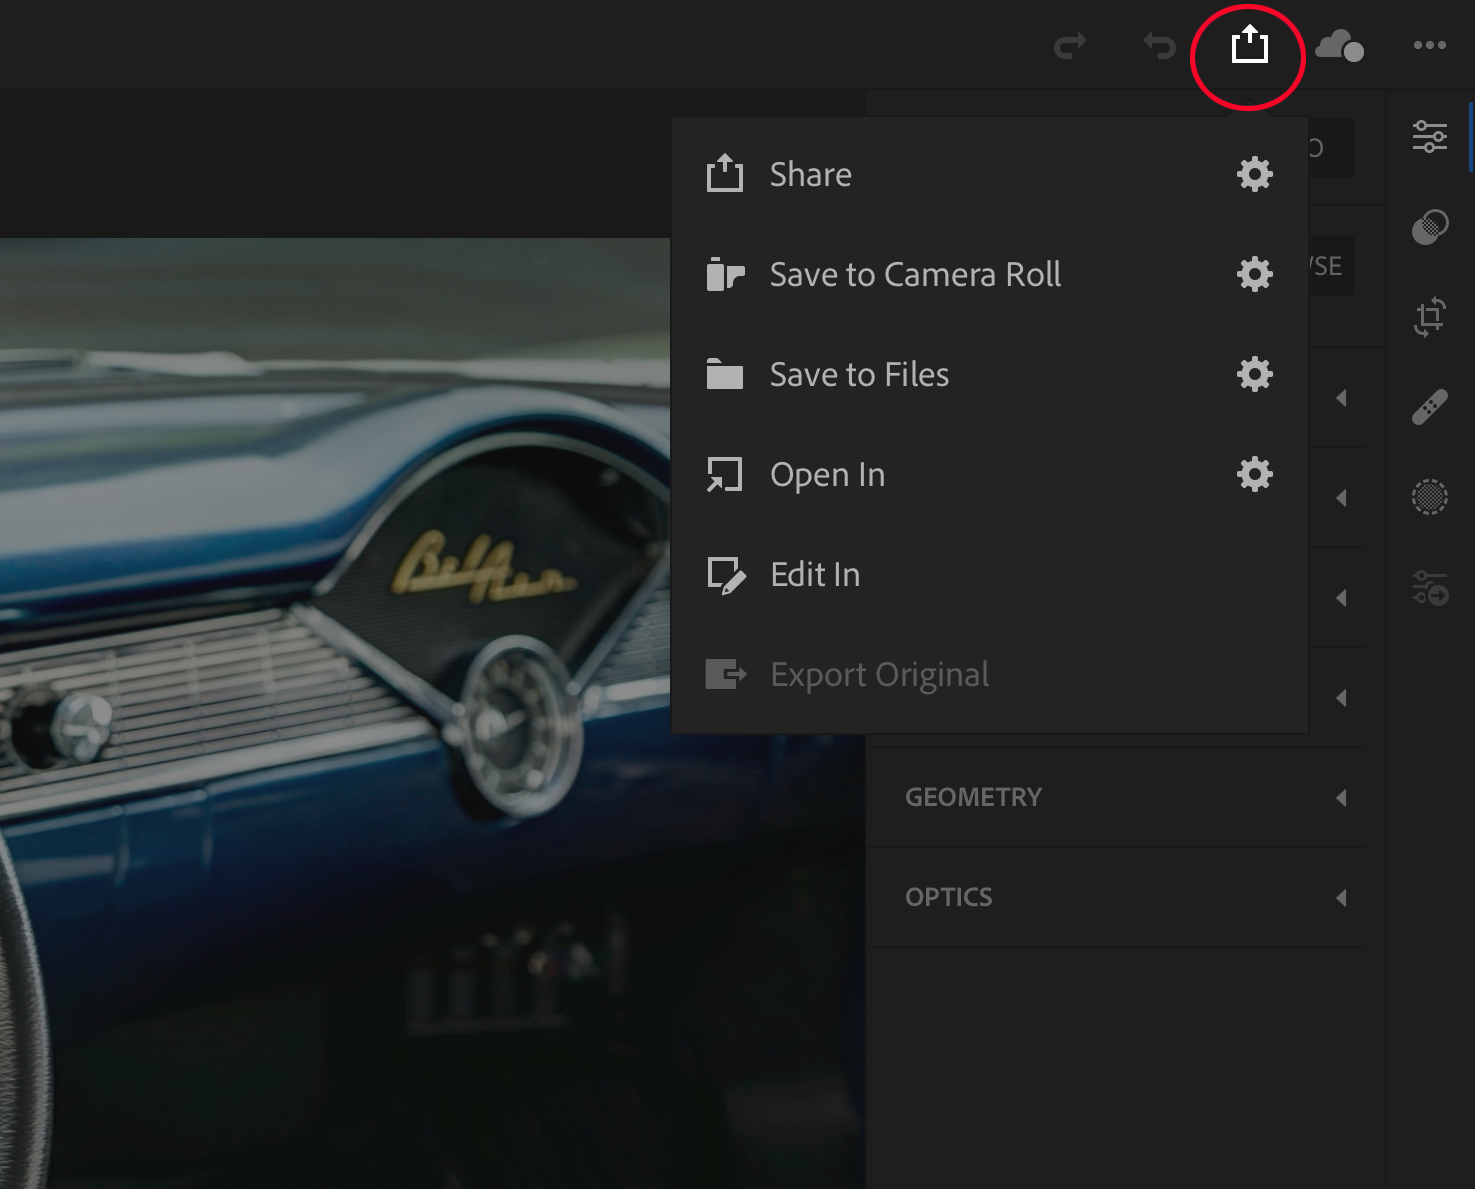
Figure 3
6) When the sharing dialog opens (shown in Figure 3) you have two different options. You can click Share and select Instagram from the meny, or you can choose Save to Camera Roll which lets you upload directly from the Instagram app instead of through Lightroom CC. I prefer to save the photo to my Camera Roll and use the Instagram app because it provides me with greater control. (See step 9.)
7) When you choose Save to Camera Roll, the Image Size dialog opens (shown in Figure 4). Choose Small – 2048px since you don’t need a large file for Instagram.
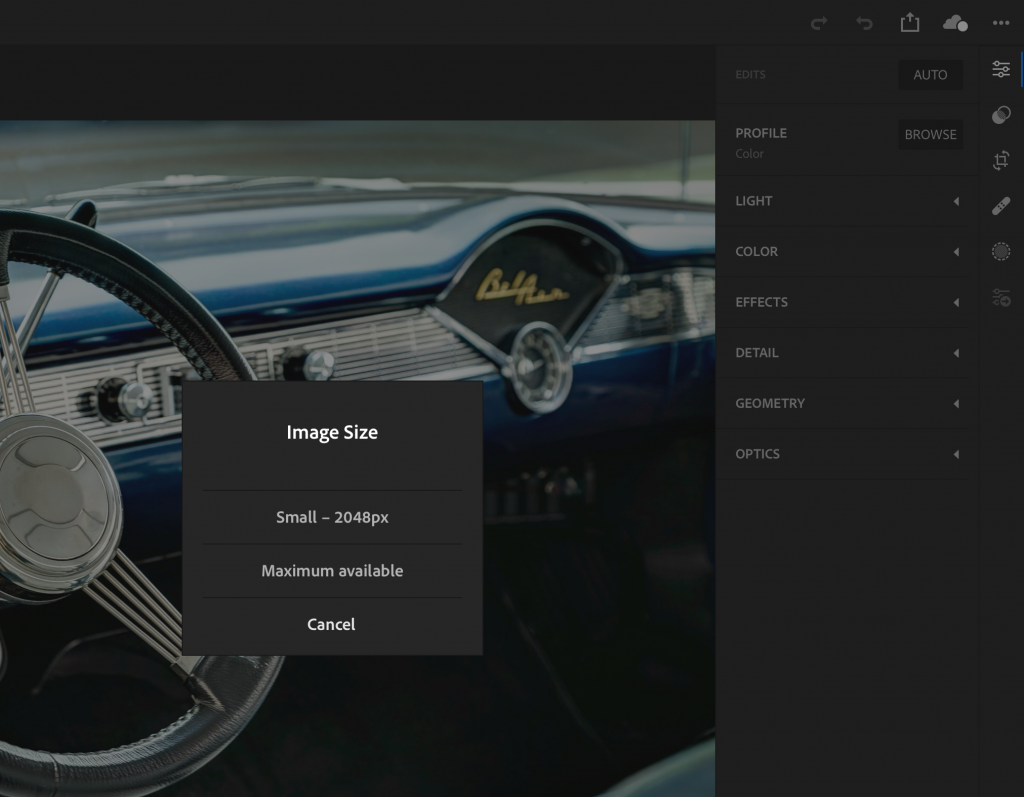
Figure 4
8) Now go to your Instagram app and upload the file using the usual Instagram method.
9) If you want to maintain your original crop instead of Instagram cropping to its standard aspect ratio, click the button at the bottom left, (circled in Figure 5).
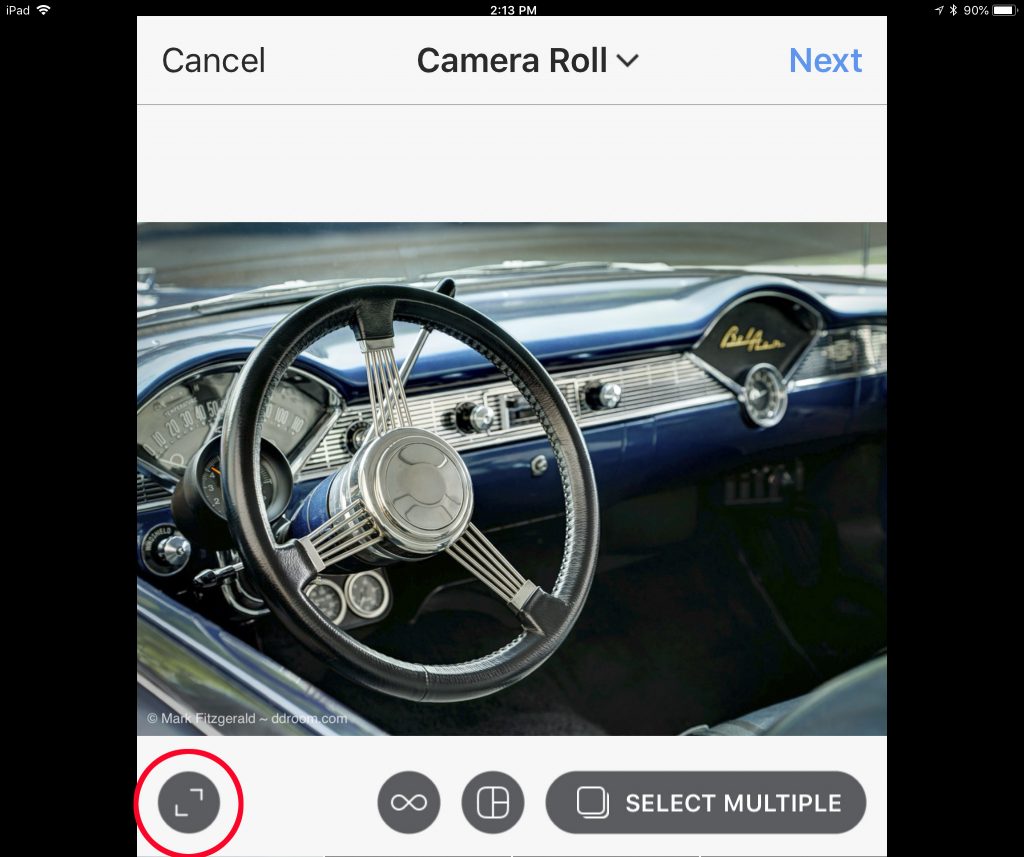
Figure 5
That’s all there is to it. Now when you want to add more photos to Instagram all you need to do now is select them and press B in Lightroom on computer. They will automatically sync to Lightroom CC on your mobile device. Then go to Lightroom CC on your device, save the photo to your camera roll, and used the Instagram app to upload it.
One other thing I like to do when uploading to Instagram is to add a copyright watermark to the image. If you want to see how to set that up so it happens automatically, check out this post: Adding Watermarks In Lightroom On Your Mobile Device.
TIP: Another advantage to this method is that after the photo is on your mobile device and you see what it looks like on that platform, you can use Lightroom CC on your device to make final tweaks before uploading it.
When was the last time you checked your backup?
When was your last backup performed?
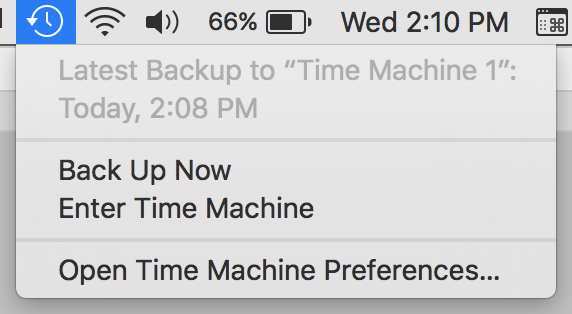
Setting up an automatic backup of your system is critical to maintaining a healthy organizational system. There are lots of great options for both Mac and Windows, many of which are easy to setup. For example I use Apple’s Time Machine to backup my workstation. Once I setup a Time Machine drive I can leave it plugged in and it updates every hour. I never need to think about it again unless I need something from the backup. At least that’s the conventional thinking. But set and forget on a backup can lead to serious issues.
A good client recently had an experience with her Time Machine backup that serves as a reminder that we need to periodically check our backups to ensure they are doing their jobs. My client took her iMac to an Apple Store to have the hard drive exchanged for a newer one. The technician at the store asked her if she had a backup before they began working on her system. She responded that she had a Time Machine backup drive plugged into the system at all times.
When my client picked up her iMac from the store and returned home, she attempted to restore her system using her Time Machine backup. She was shocked to learn that the most recent backup on her Time Machine backup was six months old. For some reason Time Machine had quit working and she hadn’t noticed. This let to a real mess that took lots of time and money to sort out.
I have had the same experience with not noticing that a backup failed using Time Machine, as well as other backup solutions such as Chronosync. My client’s experience was a good reminder that it’s important to monitor your backups to make sure they are doing what you want them to do.
Adjusting for Daylight Savings After the Fact in Lightroom
Each time I experience the biannual shift in time for Daylight Saving, I hear reminders to change the batteries in our smoke detectors, but no one reminds photographers to also change the time in their cameras. Capture time may not be as important as functioning smoke detectors, but having the wrong time in your camera can cause problems, especially when working with other photographers or shooting with multiple cameras. In these cases files captured at the same time from the two cameras won’t display next to one another when sorted by capture time, which can create an organizational mess.
Fortunately, it’s really really easy to adjust capture time in Lightroom. To do so, select all photos that need to be modified in Grid view. Then choose Metadata > Edit Capture Time. When you do, the Edit Capture Time dialog shown in Figure 1 opens.
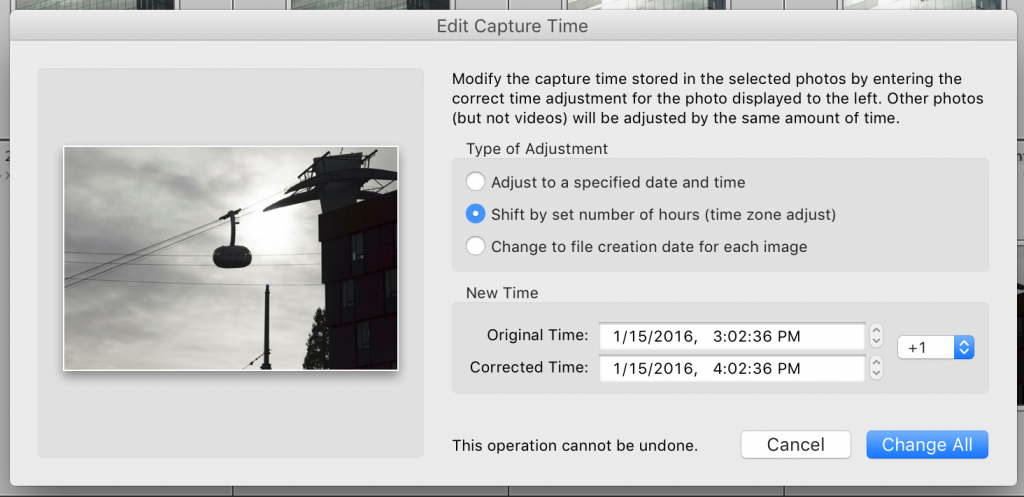
Figure 1
This dialog gives you three options to change the time. If your clock is off by an hour due to Daylight Saving, the easiest method is to use the Shift by set number of hours option. When you choose this option, a numerical menu is displayed to the right. Use it to adjust the hour plus or minus one or more hours. You can also type directly into the Corrected Time textbox if you need to change time by something other than round numbers (1 hour 12 minutes, for example). After you have the correct time set, select Change All to adjust metadata on all selected photos.
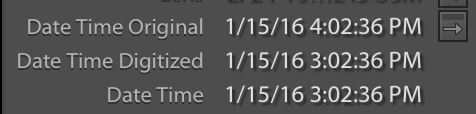
Figure 2
If you check a time changed file’s time in the Metadata panel, as shown above in Figure 2, you’ll see The original time has been modified to the new value, but the actual “original” time is still what was recorded by the camera. When you sort by capture time in Lightroom, the new “original” time is used so now the files will sort in correct order.
Note 1: There’s a scary warning at the bottom of the dialog in Figure 1: “This operation cannot be undone”. This is an odd warning because it’s easy to undo the time shift by choosing Metadata > Revert Capture Time to Original. What Adobe is really trying to say here is that you can’t use Edit > Undo… to undo a change made with Edit Capture Time.
Note 2: When Write Date or Time Changes Into Proprietary Raw Files is selected in the Metadata section of the Catalog settings, the metadata for those files will be updated to reflect the change (rather than it just being stored in Lightroom’s catalog). However, the time can still be reset to the “original time” using the method described above in Note 1.
What Colors Do You See?
I had a conversation with a commercial photographer friend yesterday that got me thinking about color blindness and photography. Color perception is something many of us take for granted, but you would be surprised at how many people suffer from some form of color perception deficiency (commonly called color blindness). For many people this has little real impact on their lives. But for photographers seeing color accurately can be important.

- Can you see the numbers here?
The photographer I spoke to yesterday told me his color perception is weak in the red/green spectrum, which is the most common form of color blindness that affects 99% of color blind people. My friend said that whenever he needs to adjust critical color on images that have predominant red and green colors, he asks his wife (who sees color quite well) to look over his shoulder.
I have met several photographers who have various stages of color perception deficiency, from mild to severe. Each has developed methods for successfully dealing with color in his or her photography. The key here is these people are aware of their color blindness. If you don’t know if you have a color deficiency, there’s an easy way to find out.
Several years ago I was a supervisor at a professional photo lab where I managed a group of highly-skilled color correcters. When we needed to hire a new person for the team, one of the first things I would do during the interview was to have the applicant take a Ishahara Color Blindness Test to determine if he or she could see all ranges of the color spectrum. This test, which was developed early last century, is the most well know color perception test in use today.
The Ishahara Color Blindness Test consists of 38 printed plates of patterns like the one shown above. You can take an online version of the test here. Though the online version isn’t as accurate as the printed plates, you can still get a good idea of what colors you can see, or more importantly the colors you can’t see. Then you’ll know if you need to develop strategies for dealing with color when it comes to critical adjustment. One thing to keep in mind when you take the test is that many people with normal color vision still don’t pass the test free of errors.
Interesting facts about color blindness:
- About 8% of all men are suffering from color blindness.
- About 0.5% of all women are suffering from color blindness.
- A father can’t pass his red-green color blindness on to his sons.
- If a woman is red-green colorblind, all her sons will also be colorblind.
- Strongly colorblind people might only be able to tell about 20 hues apart from each other, with normal color vision this number raises to more than 100 different hues.
- See 45 other interesting facts about color blindness here.
A Reader Changed My Mind About DNG
In the past when discussing Adobe’s DNG format in Basic Lightroom classes and books, I would say converting to DNG during import poses little risk. No data is lost and the DNG format has all the Lightroom editing capabilities of the original raw format. I recommended this because an advantage of DNG is that Lightroom can write metadata directly to the file, eliminating the need for XMP sidecar files with proprietary raw formats.
The main downside to converting proprietary raw files to DNG during import is that the original raw files are normally discarded. I never considered this as a major issue because no important data is lost during the conversion. But yesterday a reader from England told me about a situation with DNG files that changed what I’ll be teaching in the future.
Conor explained that he was planning to enter some photos in a wildlife photography competition. The rules for the competition stated that if your work is selected, you will need to provide the original raw file of the image to show it hasn’t been edited in certain ways, such as compositing. The rules also stated that DNG files would not be accepted as original files. The reasoning behind this is that proprietary raw files (such as CR2, NEF, ORF, etc.) that come directly out of a camera cannot be permanently edited. You can always revert the file back to its original status. But this isn’t true with some DNG files.
Though some cameras are able to capture raw files in the DNG format, you can also create DNGs outside the camera. For example I can convert a heavily edited TIFF to the DNG format. Due to this flexibility a DNG file cannot be trusted to be a representation of an original file. This is why Conor ran into the problem with the wildlife competition. I imagine DNG is also an issue when entering photojournalism competitions and when presenting photos as evidence in legal proceedings.
These situations may apply to only a handful of photographers, but they are reason enough for me to change my point-of-view on DNG. For now on I’ll tell students to forego the DNG file format and keep their original raw files intact. Yes, you can embed the original proprietary raw file inside a DNG when converting during import, but that will make the file almost twice as big as the original. I don’t see any advantage to DNG that would justify doubling the size of all your raw files.
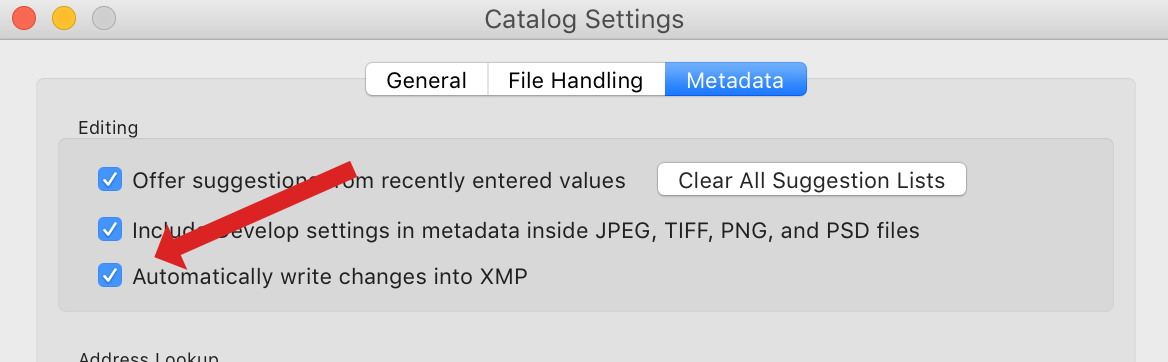
One more thing. Be sure to go to the Metadata tab in Lightroom’s Catalog settings and select the option to Automatically Write Changes to XMP, as shown in the figure above. This will ensure Lightroom’s metadata is saved with the original raw file rather than being buried in Lightroom’s catalog. This way if something unexpected happens and corrupts your catalog and you don’t have a good backup, all your edits are with the original files.
Show Focus Points in Lightroom
A feature that I’ve always wanted in Lightroom is the ability to use a photo’s metadata to see where the camera focused when I shot the photo. The metadata is in the file, but for some reason Lightroom doesn’t use it. Now I can stop waiting for Adobe to add this feature because of a really cool, free Lightroom plugin named Show Focus Points, created by Chris Reimold. I’m not a huge Lightroom plugin user, but this one is a must have.
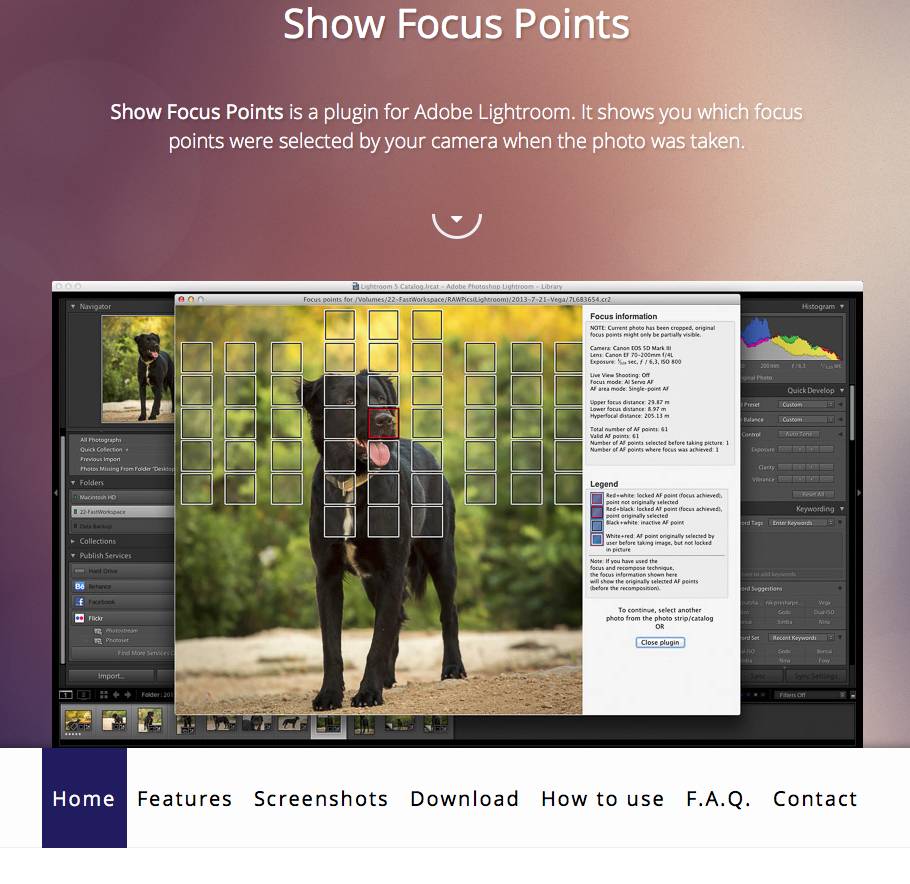 In addition to showing the main focus point, Show Focus Points also displays information about focus distance, number of focal points, hyperfocal distance, and more. Though the plugin works on both Mac and Windows, it only works with Canon and Nikon cameras. Also be aware that the only way to deploy the plugin in Lightroom is to use Library > Plug-In Extras, which is one of the more unusual methods for using a plugin.
Here’s a link: http://www.lightroomfocuspointsplugin.com/.